Using the UCSB AI Commons API with OpenCode and Continue
This guide explains how to configure the UCSB AI Commons OpenAI-compatible API for two popular AI coding assistants:
- OpenCode (terminal-based coding agent)
- Continue (VS Code and Positron extension)
Prerequisites
Before starting, obtain the following from AI Commons:
- AI Commons endpoint (Base URL)
- API key
- Model names
The API is an add-on feature to the AI Commons that is not present by default. To request API Access, please submit your request here
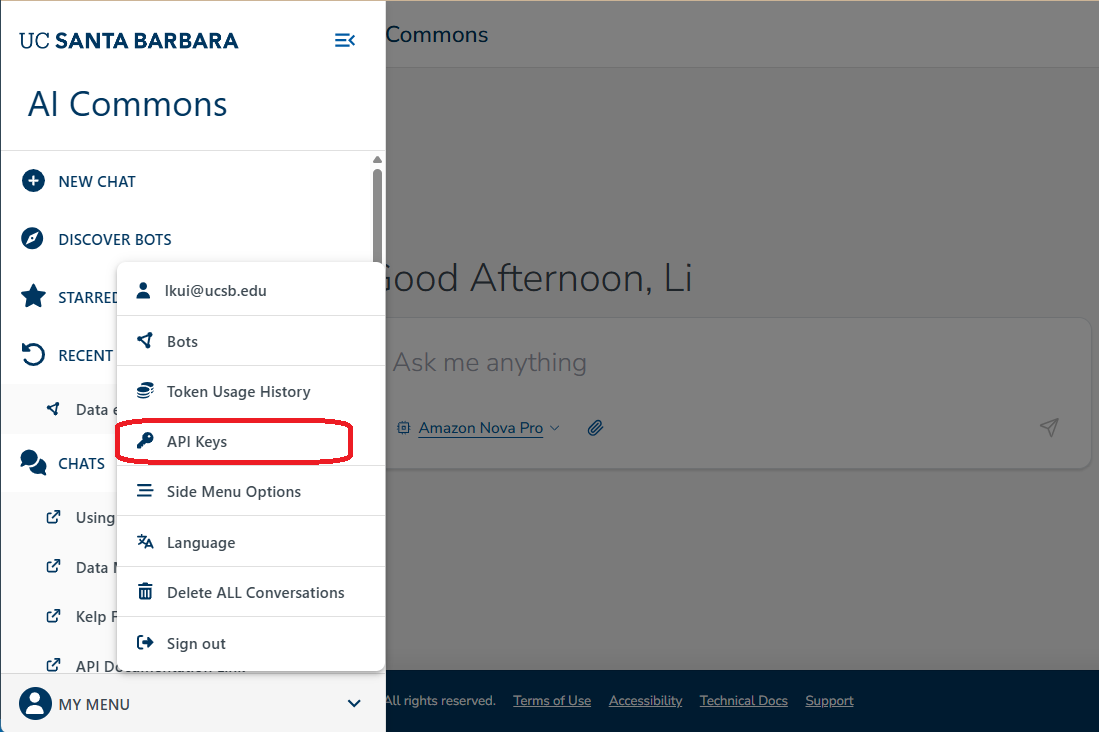
If you have successfully gained API access from ITS, you should see API Key as one of the options in your My Menu list on the AI Commons portal:
From there, the API interface will look like this:
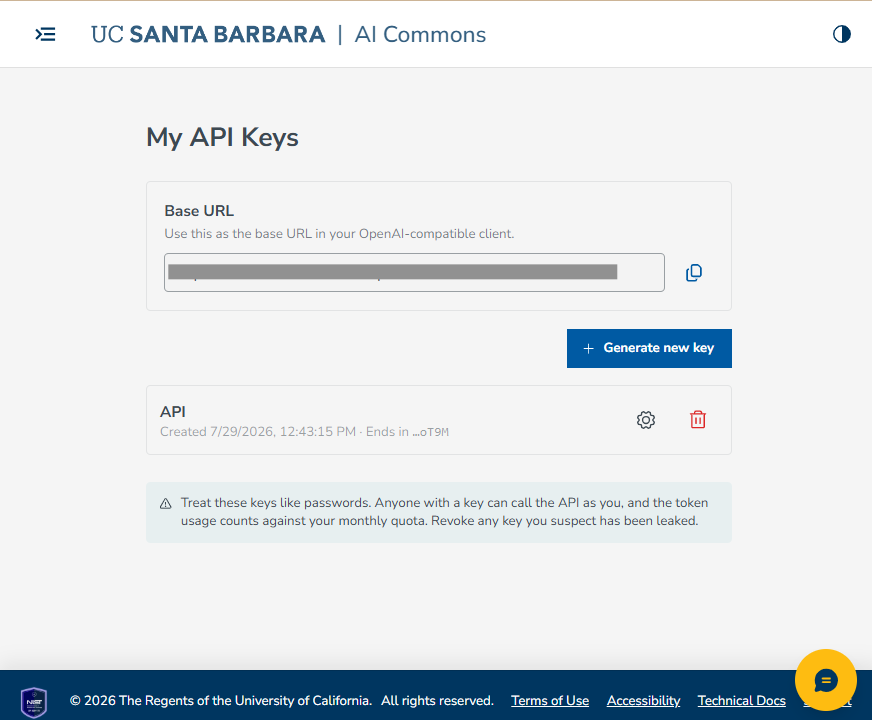
Model names: For the full model reference, see the AI Commons OpenAI-Compatible API Reference. In case AI Commons have models that are not updated in the document, run:
curl -s https://YOUR-AI-COMMONS-ENDPOINT/v1/models \
  -H "Authorization: Bearer YOUR_AI_COMMONS_API_KEY" \
  | python -c "import sys, json; [print(m['id']) for m in json.load(sys.stdin)['data']]"
This prints a clean list of model names, for example:
claude-v4.6-sonnet
claude-v4.6-opus
claude-v4.5-haiku
amazon-nova-pro
OpenCode
OpenCode is a terminal-based coding assistant that can be launched from Git Bash, VS Code, or Positron.
Step 1. Install OpenCode
Follow the installation instructions on the OpenCode website.
Verify the installation:
opencode --versionStep 2. Configure OpenCode
Open the global configuration file:
~/.config/opencode/opencode.jsonExample configuration:
{
  "$schema": "https://opencode.ai/config.json",
  "provider": {
    "my-custom-provider": {
      "npm": "@ai-sdk/openai-compatible",
      "name": "AI Commons",
      "options": {
        "baseURL": "https://YOUR-AI-COMMONS-ENDPOINT/v1",
        "apiKey": "YOUR_AI_COMMONS_API_KEY"
      },
      "models": {
        "claude-v4.5-haiku": {
          "name": "claude-v4.5-haiku"
        },
        "claude-v4.6-sonnet": {
          "name": "claude-v4.6-sonnet"
        },
        "claude-v4.6-opus": {
          "name": "claude-v4.6-opus"
        }
      }
    }
  }
}
Replace:
https://YOUR-AI-COMMONS-ENDPOINT/v1YOUR_AI_COMMONS_API_KEY
Step 3. Start OpenCode
Launch OpenCode from your project directory by running the following command in any terminal — the integrated terminal in VS Code or Positron, or a standalone terminal all work:
opencodeInside OpenCode you can see available models:
/modelsYou are all set. Start chatting with the model directly in your terminal.
Continue (VS Code and Positron)
Continue is an IDE extension that provides chat and coding-agent capabilities for both VS Code and Positron.
Step 1. Install Continue
Open the Extensions panel and search for the Continue extension published by Continue:
Continue - open-source AI code AgentIn Positron, installation may fail with a version mismatch error. If this happens, follow the guidance shown in the Notification panel (bottom right corner) and install it manually via Ctrl+Shift+P → Extensions: Install from VSIX.
Step 2. Configure AI Commons
The user configuration file is located at:
~\.continue\config.yamlYou can open it directly from within the IDE:
- Click the Continue extension icon in the sidebar to open the Continue panel.
- Click the settings icon (top right corner of the Continue panel).
- Select Configs on the left side of the settings panel.
- Click Main Config to open the configuration file.
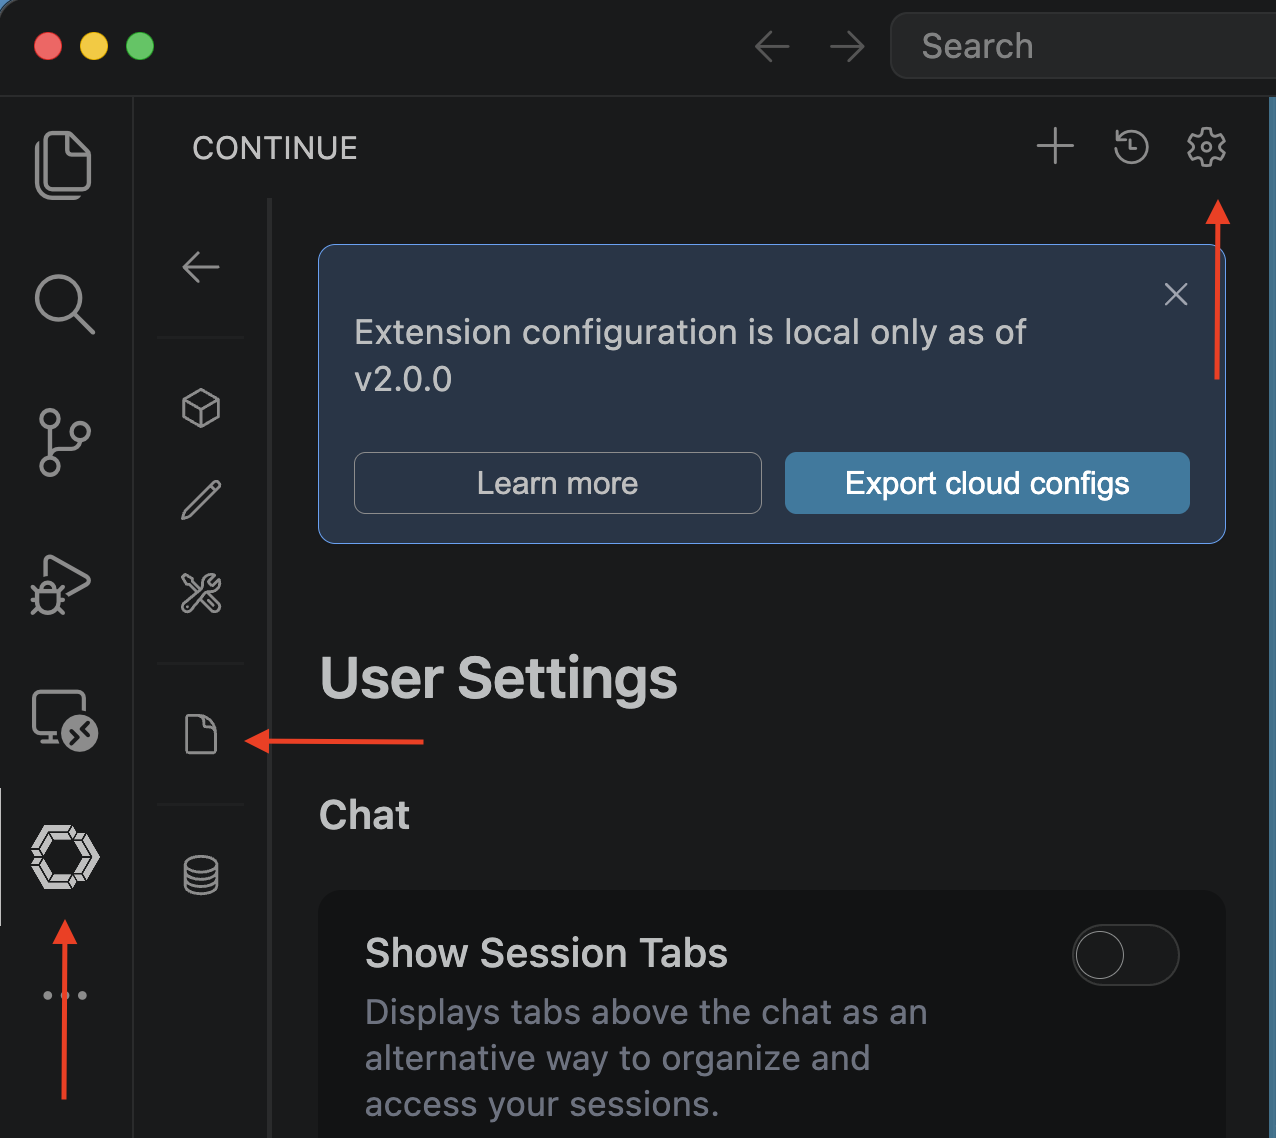
Paste the following into your config:
Example configuration:
name: UCSB AI Commons
version: 1.0.0
schema: v1

models:
  - name: Claude Sonnet 4.6
    provider: openai
    model: claude-v4.6-sonnet
    apiBase: https://YOUR-AI-COMMONS-ENDPOINT/v1
    apiKey: YOUR_AI_COMMONS_API_KEY
    roles:
      - chat
      - edit
    capabilities:
      - tool_use

  - name: Claude Opus 4.6
    provider: openai
    model: claude-v4.6-opus
    apiBase: https://YOUR-AI-COMMONS-ENDPOINT/v1
    apiKey: YOUR_AI_COMMONS_API_KEY
    roles:
      - chat
      - edit
    capabilities:
      - tool_use

  - name: Claude Haiku 4.5
    provider: openai
    model: claude-v4.5-haiku
    apiBase: https://YOUR-AI-COMMONS-ENDPOINT/v1
    apiKey: YOUR_AI_COMMONS_API_KEY
    roles:
      - chat
      - edit
    capabilities:
      - tool_use
Replace:
https://YOUR-AI-COMMONS-ENDPOINT/v1YOUR_AI_COMMONS_API_KEY
You are all set. Open the Continue panel in your IDE and start chatting with your models.
Authentication Problems
Verify:
- Base URL is correct.
/v1is not duplicated.- API key is valid.
- No extra spaces exist in the key.